Monday, August 1, 2011

How to: Make a garden

I got this idea from "The Man Cave" blog, so this isn't something I thought up, but works quite well I thought, and very simple.

Materials:
  • MDF board (any size needed).
  • Scrape brown corrugated card-board (any size needed).
  • Paint: dark brown, tan, dark & light green.
  • Elmer's Glue (PVA white glue).
  • Xacto knife.
  • Wax paper.
Step 1: glue the card board to the MDF board. Mistake I made was putting to much glue on the card-board and when it dried it warped the MDF board. Size of card-board and MDF board is according to your needs.

Step 2: Peel the top side of the card-board off to expose the baffle that exists between both sides. To help assist in this peeling, I placed a damp paper towel to soften the card board paper.

Peel off the top side of card-board that is glued to MDF board.

Step 3: I began painting using dark green for some crops growing but after an inch it didn't look right. Next I went down each mound top and laid down the white glue. Then I liberally sprinkled saw-dust over the entire board and let it dry (over night). To get lots of saw-dust I went to a national home improvement store that cuts lumber (lumber yard would also work) called Home Depot in the USA. I got for free two shopping bags of saw-dust.

Place white glue along each mound top and liberally sprinkle saw-dust.

Step 4: Shaking the saw-dust off after it had dried left saw-dust on top of the mounds which I then painted a dark green and later spotted the tops with bright green. Using dark brown I ran the brush between each row so it looked like the plot was watered, but I didn't like the look, so I used a small brush and ran it down the middle of the dark brown a tan line which happened to match the brown of the card-board. This looked better to me. Some areas didn't take to the saw-dust or was very thin and this helped make the garden plot more realistic. Those areas I left bare.

Painted garden plot.
Step 5: The edges of the plot was not finished, and to do so I placed the board on wax paper and ran white glue along the edges letting it drip down onto the wax paper and liberally sprinkled saw-dust and let dry for several hours. The glue did not stick to the wax paper. I then turned the board upside down to get rid of the saw-dust and washed the edges in dark brown, then later washed it with tan.

Finish off the edges with saw-dust washed dark brown, then tan.


Step 6: Spray the board with diluted white glue (1:1) and let dry.

Now the final step will be finding a figure that is hoeing to work in the garden!

Card-board can also be used as corrugated tin sides & roofing too for more modern scenes.

Friday, July 29, 2011

Dwarf bagpiper painted

Finally worked on the dwarf bagpiper I got from Reaper. I enjoyed the sculpting but the drag is it is way bigger then the 28mm that I'm painting. I wanted to draft him into my Celtos warband for the Gaels/Irish don't have a piper, and why is a big oversight for the Gaels three instruments are the bodhran (small hand drum), harp, and the bagpipe.
     In the future my plans are to make Clare's Regiment (Wild Geese) in the Service of France. This infamous company had three generations of the O'Brien family as its commanders. A big problem is cannibalizing some figures to make a piper, for the Irish Brigade went into battle under the skirl of the bagpipes.
     My biggest problem in painting are the eyes. I just can't do the eyes yet. Read on one blog about using an artist mechanical pen to make the eyes. There isn't an art or drafting store nearby so I got an extra fine at Staples. Although one can make a small dot the blogger didn't mention the problems some figures might have with sunken eyes so the pen hits above & below the eye socket.
As for this figure, it shall just sit on my desktop computer tower.


Well my painting is getting better! Several visitors tipped the following:
  • to dilute the paint.
  • Layer with washes starting with darkest color and going lighter each wash. (Tried this and it worked very well, but . . . I don't have a wide variety of paint colors and this limits things. Yes I've tried using black and white to dilute the colors, and just not having a good experience with this.)
  • Dry brushing is getting better, SOMETIMES, such as with the piper's cape & hair.
Painted the bagpipe to look like mine, where the white is bagpipes used to use ivory. Today, such as mine, imitation ivory plastic is used since to use and have ivory now is illegal. Those who are really good piper's, have sterling silver replacing the ivory. Just noticed a small glitch which I shall correct. Forgot to paint black holes a top the pipe's. (The poor piper is going to huff & puff with no sound [although some would appreciate this lack of musical sound].)

Friday, July 15, 2011

Celtos type of new game

     One of the tribes in my Gaelic/Celtos game that I'm creating are the Dwarves. In the original Celtos game the Dwarves are called "Vanir" out of Norse myth. The reason I'm not using the Celtos figures is 1) the cost, and 2) the difficulty is getting them. In the U.S. they do have a distributor but the California company has a problem with supply; they order a $30 restocking order and are charged $100 shipping with DHL. I could go to the makers and suppliers in England, but the cost of shipping and currency change for me is costly too. So I'm going with the basic idea of Celtos of various tribes warring for control of an imaginary island. Celtos' tribes are Humans/Gaels, Dwarves/Vanir, Elves/Sidhe, Undead-skeletons/Firbolgs, Beastmen/Fomorians. My new son-in-law, Alex, is a big time gamer and is writing the play rules, I'm providing the history. Included in the storyline will be encounters with the top ten scary things relating to Ireland: Banshees, ghosts, spirits, beheaded horseman, pookas/goblins, and vampires, etc. Also will have a story on the inauguration of the Gael king/chief, an enchanted forest, dolmens and standing stones. Each tribe will have a wizard/shaman/druid, as well as mounted troops of which the Gaels will have war-chariots, the Elves ride eagles and Goblins ride wolves. 
     This of course will be a skirmish game, and I'm making it an adult family game for my three grown kids and their spouses.
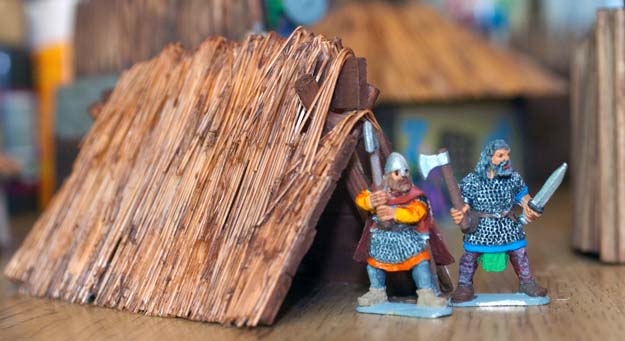
     So I need the game accessories  to be moveable, being played on the floor for nobody has a table big enough. Each of the tribes is having a home base: Gaels have a ring-fort, Sidhe (Gaelic for fairy/elves) I'm making tree houses, Dwarves have a mountain type mine, the barbarians have Aframe huts, and the goblins will have roundish huts, and the Skeletons earth mounds. This is what I have so far.

Mountain mine: home base for Dwarves.
      Making the Dwarf home base wasn't hard. I found in the garbage at my wife's work a styrofoam packing end for printer toner cartridge. All I did was cut an entrance and paste with Elmer's Glue varies broken pieces of styrofoam, The only carving I did was making a stair case. Then painted by washing with gray paint and then outlinning the pieces in charcol gray. Still need to do a lot of touchup on white spots. The enterance for me is reminescent of in the first "Lord of the Kings" movie when the band entered the mountain of moria. Would be nice to paint runes on pillars. Top is suppose to be a ruined outpost.
      I've painted so far the Gaels, Dwarves, and Barbarians. Saving now for the Elves. I searched a database of the Dark Heaven figures made by Reaper for I find their figures really nice. But when I matched one that I ordered with my Dwarf figures by Red Box, I found a great discrepancy in size. I'm working my game to be in the 28mm range and the Reaper figures are in the 32-35mm range; way to big as one can see in the accompanying photo. Many of the Reaper figures where great to have a female war-band for each tribe making it possible for couples to have a tribe together. Now I'm having to rethink the scenarios for Red Box doesn't have enough female models to make up a war-band of twelve (ten warriors, a standard-bearer, and musician). Going through Reaper, there were enough female figures to have a female war-band of Dwarves, Elves, and Humans.

(left) Red Box dwarf : (right) Reaper Dark Heaven dwarf.
Red Box Dwarves. Waiting on three that are backordered.

Tuesday, July 12, 2011

Painting: round two

I've painted a new set of Irish miniatures for my village.  Did a little better on dry brushing, and one comment was that the flesh tone wasn't right and to try wet-washing with some brown, which I did and it does seem better. However, my eyes still are very bad.

How to: Make Celtic ring-fort


Having a limited budget purchasing a fancy Celtic ring-fort from the various manufacturers is out of the question, so I went about making one of my own. First I needed to make one that could be taken apart after it's use and stored away.
     I drove around to several constructions sites and found in the dumpsters thrown away styrofoam, lots of it in big sizes. There are many different types of the foam material. The majority of the one I found has little pellets welded together and the pellets can be of various sizes. Once of the things I found about it was that with clever painting the pellets could be used as rocks or masonry.
     I found around the house round objects I could use to trace around. I traced three circles on the foam and then cut them out. In hind sight I should have cut farther away from tracing lines, then cut each layer beveled, tapering to the palisade walls.


Cutting the foam is very messy, remember to cleanup the mess, don't leave it around for someone else to cleanup (say one's wife).


I then used Elmer's tacky glue to adhere the three circles on top of each other.Make sure the glue used is safe for styrofoam, many glues will melt the foam. I then cut the circle into three sections and cut two small holes for magnets (make sure the polarities are right).


I then painted the bottom two levels a dark brown for earth, and the top layer gray for rocks. I went to the market and purchased a pack of 50 bamboo skewers for cooking for $2.25 USD. It took three packs to form around the top of the rings to be used for palisades, I used about a third of the length of the stick.The bamboo I could stick into the foam, later I glued them into place for added strength.


I then went to the hobby store and bought a box of 1000 Popsicle sticks, cut off the round ends and glued them down behind the palisades as a catwalk. Using brown paint wash over the palisade walls and walk ways. Don't worry if the painting isn't even. The left over bamboo and sticks can be used for other projects. Using left over plastic canvas from the round hut project, I cut off a couple lengths to look like ladders, and painted a different brown color.

Last step is covering the earth area of the ringfort with a water/glue dilution and use pre-painted sawdust, sand, or real dirt, and sprinkle over area liberally. Turn upside down and lightly shake off excess, then spay over with like solution to make shure it sticks. (I haven't done this yet.)  
 
Using the left over bamboo and Popsicle sticks, balsa wood and broom bristles from the round hut project, I built a guard tower over the enterance of the fort. Still deciding how to make a gate.


Monday, June 20, 2011

How to: Make round huts

During the wait in saving money for a lighted magnifier and another set of miniatures, I decided to design and create an Irish ring-fort and buildings out of free stuff. Following is how I went about creating wattle & dob huts with thatch roof out of mostly free stuff.


Step 1 : I obtained a couple 8x11 sheets of card stock for making the roof. I bought a sheet of plastic canvas at the hobby & craft store in brown for .56 cents and a 36 inch piece of balsa wood for .29 cents. Went to the Dollar Store and bought a broom (use the bristles for thatch). Out of the trash I salvaged a hot chocolate and orange juice can, both made of paper/cardboard (just washed them out). Looked at various kitchen ware for something circular that I could draw a circle with in the size desired. Make sure roof extends beyond walls.

Step 2 : Using a cereal bowl to draw around to make a circle on the card stock. Cut the card stock circle out with scissors, using two sheets (to make the roof more stable). Drew a radius line from edge to middle of circle and cut the line. Then bent card stock into a cone and glue, when dried, paint a dark color (black, brown gray). Cut a hole in the tip of cone. Small can used as a small storage hut, thus didn't have hole in top.

Step 3 : Taking a miniature figure (28mm) to measure height of hut and doorway, and drew lines. Taking a Dremel circular tool (or xacto knife, scissor), cut the height of the can, and having done so cut the doorway. I used the half of the can with the metal bottom which I shall brush diluted glue on and dump sand/dirt for flooring, then spray diluted glue on dirt to help it stick.

Step 4 : Paint the cut can the color desired. For a more plaster look, use a mixture of flour, glue, salt, & water (google web for correct recipe). Taking an xacto knife cut a couple of holes in which to glue a piece of plastic canvas over hole from inside the can. This makes the hole look like it needs repair and has a wattle & dob look (to me). Depending on color of paint for hut, the canvas may need to be painted a different color.


Step 5 : Cut balsa wood to length as the door posts and length of wall posts for height around the can (about 3 or 4). Glue them on the quarter areas of circle on outside of can (if re-moveable roof, have inside posts also). Paint the posts.

Step 6 : Placing the card stock roof on the can top, cut the bristles from the broom head, and then cut them to length needed for the roof. Glue small sections and placed down bristles. Layer them to look more like thatch roofs in England (sort of). Use a lot of white glue which dries clear. Using a washing technique in brown, paint the roof. Don't forget to paint the hole and thatch around the hole a black color, for smoke damage. If roof isn't to be removed, glue down.

 Step 7 : The various photos viewed on the web of Irish huts didn't show any doors so I used a cut piece of cloth to hang down. I then used blue paint and drew a few Celtic symbols on hut outside wall.

 
Step 8 : To make A-frame hut, take two round sticks and create an X on one end and glue. Using popcycle sticks, cut the round ends off, and laid them against the X posts, the X posts being one on each end. After gluing planking up stick sides, painted desired color. Then cut bristles to size desired and glue them down and wash with paint.      

Sunday, June 5, 2011

How to: Step 3 - Painting

After priming the 28mm miniature, letting it thoroughly dry, the next step is painting. Don't buy cheap brushes. Some folks use nylon but it appears for most people the nylon bristles are to stiff. Try to get red sable hair brushes. Use only the tips for painting & don't let the paint get more then halfway up the bristles. Clean the brush in water often while painting. When finished rinse the brush in luke-warm water with soap. Remold the brushes bristles in your finger tips.

Use small red sable hair brush
 Base coat

There are several ways to do the base coat:
1)  Paint the entire figure in black/dark brown. Then layer the chosen color from dark to light.
2)  After painting entire figure wash each area with darkest color.
3)  Base paint in dark color chosen, then layer the highlight areas with a shade lighter, then lighter a second time.

If one only has the base color of paints, use white and black paint to get the shade of color desired. Problem with this is making sure one has mixed enough paint for the project.


In hind sight I should have painted the small inner areas first & the little details. It is okay to splash paint beyond your target area. Later when painting that area it will be corrected. If one needs to remove extra paint use a cotton swab. Don't apply the paint in streaming amounts, over painting will clog up the fine details. As for painting highlights, chose the areas where the sun light would hit if shining straight down. To help in this place a light overhead and see where light strikes the figure.

I was going to paint a hem pattern on the bottom of the figure holding the sword, and on the sword scabbard, but with out a magnifier, forget it.


Figure brushed in black wet wash
 Wet Wash

The step after base painting and painting highlights is a technique called wet washing. Take the dark base color and dilute it down with water 2 parts water to 1 part paint (this is trial & error, perhaps more dilution is wanted, experiment). Another way of wet washing is dipping the tip in black paint then dip it into water, then run the brush over the figure with the wash. Either way chosen, layer the washes.

Theory is that the dark wash with run into the lines and crevasses and make them dark giving better shading to the figure. I tried the black wash style and did not like the results. To me all it did was mute the colors and make the flesh area grey looking. I went back and touched up the flesh colored areas (notice figure at left has no eyes) My understanding is this takes practice by doing it and modifying to one's own style. I have a lot of practice!


  Dry brushing/washing

Dry brushing, didn't work to well
The second to last step is called dry brushing/washing. This is taking a dry brush dipping in lighter paint or just white, then wiping most of the paint off the bristles, then quickly flick the brush over the highlight areas. Again this is to help in shading. It appears to me that I need to practice this a lot too!

My first figure painted isn't to bad considering I did this without a magnifier, which I highly recommend! In my old age the eye Doc gave me bi-focal eye glasses, which I hate to wear, and usually don't. My vision is still 20/25 without them. I also wish the colors were brighter, and the washing both wet & dry need a lot of work. Oh yes. The eyes, mine suck because I needed a magnifier, and a hand hold one won't do! Also finish the base off. I haven't done this cause I'm still trying to figure out bases, which shall be my next post.

The final step is using a sealer, most folks use a spray matte finish. The sealer protects the paint job. Matte is preferred cause it looks natural, where gloss does not.

Thanks to Ray and Paul for their help. I'll keep posting my learning how to paint and we shall all see if I improve.