Materials:
- MDF board (any size needed).
- Scrape brown corrugated card-board (any size needed).
- Paint: dark brown, tan, dark & light green.
- Elmer's Glue (PVA white glue).
- Xacto knife.
- Wax paper.
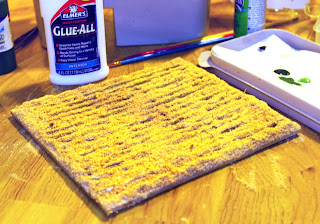
Step 2: Peel the top side of the card-board off to expose the baffle that exists between both sides. To help assist in this peeling, I placed a damp paper towel to soften the card board paper.
 |
| Peel off the top side of card-board that is glued to MDF board. |
Step 3: I began painting using dark green for some crops growing but after an inch it didn't look right. Next I went down each mound top and laid down the white glue. Then I liberally sprinkled saw-dust over the entire board and let it dry (over night). To get lots of saw-dust I went to a national home improvement store that cuts lumber (lumber yard would also work) called Home Depot in the USA. I got for free two shopping bags of saw-dust.
 |
| Place white glue along each mound top and liberally sprinkle saw-dust. |
Step 4: Shaking the saw-dust off after it had dried left saw-dust on top of the mounds which I then painted a dark green and later spotted the tops with bright green. Using dark brown I ran the brush between each row so it looked like the plot was watered, but I didn't like the look, so I used a small brush and ran it down the middle of the dark brown a tan line which happened to match the brown of the card-board. This looked better to me. Some areas didn't take to the saw-dust or was very thin and this helped make the garden plot more realistic. Those areas I left bare.
 |
| Painted garden plot. |
 |
| Finish off the edges with saw-dust washed dark brown, then tan. |
Step 6: Spray the board with diluted white glue (1:1) and let dry.
Now the final step will be finding a figure that is hoeing to work in the garden!
Card-board can also be used as corrugated tin sides & roofing too for more modern scenes.
looks good. Very effective.
ReplyDeleteVery good -- I might have to give this a go myself.
ReplyDeleteWell done great tutorial!
ReplyDelete